Adding and Managing Members
Rubric makes it easy to add members to your club, whether they join online, sign up in person, or are imported from an existing membership list.
Once members have joined, you can manage their information, update their membership details, and export your membership list.
Before you start: You must first create at least one membership type before you can sell memberships or import members. Follow the instructions in the Getting Started with Memberships article to set up your membership types.
Note: Some Memberships features are controlled by your university or student union. Depending on your organisation's settings, certain options may not be available to your club. If you don't see an option described in this article, contact your university or student union administrator.
Issue Memberships Online
Students can join your club online through your Link In Bio.
Your Link In Bio displays the membership types available for students to join, along with their prices and other relevant information.
You can share your Link In Bio on your club's website, social media, or other platforms to help students find and join your club.
Paid memberships: Students can pay online using a credit or debit card.
Free memberships: Students can join without entering payment details.
Note: Your Link In Bio profile may also appear on your student union's website.
Issue a Membership In Person
If a student wants to join your club in person, you can manually add their membership through Sell Cash Memberships.
Go to Operations.
Under the Memberships section, click Sell Cash Memberships.
Complete the Cash Membership Order Details form.
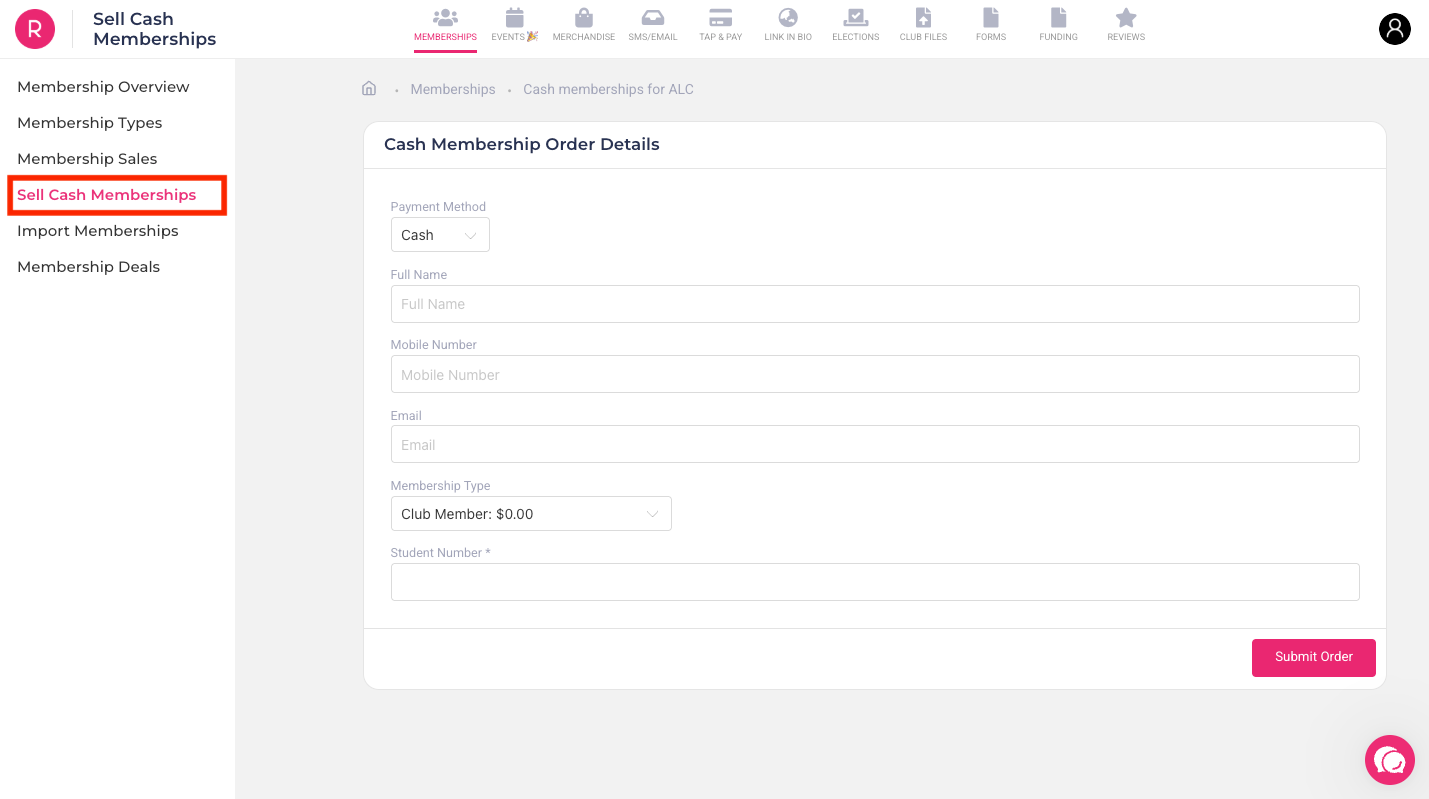
You'll need to provide:
Payment Method: Select how the student is paying:
Cash
EFTPOS / card machine
Rubric: Sends a payment link to the student's device so they can complete their payment. The payment link is valid for 24 hours.
Full Name: Enter the student's full name.
Mobile Number: Enter the student's mobile number.
Email: Enter the student's email address.
Membership Type: Select the membership the student wants to join from the dropdown selection.
Additional questions: If you or your university/student union has added custom questions to the membership type, they will appear on the form here.
Review the information you've entered.
Click Submit order.
Once submitted, the student's membership will be added to your membership list.
Import an Existing Membership List
If you're moving from another system or already have a list of members, you can import them into Rubric instead of adding each member individually.
Go to Operations.
Under the Memberships section, click Import Memberships.
Select a membership type: Choose the membership type that the imported members should be associated with.
Download the CSV template: Click Download Template and add your member information to the template.
Tip: Using the provided template helps ensure your information is formatted correctly and reduces import errors.
Upload your member list: Upload your completed CSV file and click Continue to Matching.
Review your list: Review the members you're about to import. Duplicate email addresses are automatically removed.
Finalise the import: When you're ready, click Review Import to complete the import.
Viewing Your Members
Once members have joined your club, you can view and manage them from the Membership Sales page.
Go to Operations.
Under the Memberships section, click Membership Sales.
The Membership Sales page contains your membership records. By default, the Active tab shows your current memberships.
Each membership record includes information such as:
Membership ID
Full Name
Mobile Number
Membership Email Address
Membership Type
Total
Payment Method
Payment Status
Purchased Date
Updated Date
Any additional information collected through your membership signup questions
You can use Search entire table to quickly find a specific member or membership record.
Viewing different membership statuses
The Membership Sales page is organised into different tabs:
Active: Current memberships.
Pending: Memberships that are waiting for approval or payment.
Expired: Memberships whose validity period has ended, as well as memberships that have been hidden from the public-facing view.
Cancelled: Memberships that have been cancelled.
Adding a Member Manually
You can also add a member directly from the Membership Sales page. This uses the same process as selling a membership in person.
Go to Operations > Memberships > Membership Sales.
Click Add member.
You’ll be redirected to the Sell Cash Memberships form.
Complete the Cash Membership Order Details form as described above.
Click Submit order.
Editing a Member
You can update a member's information or membership details directly from the Membership Sales page.
Find the member you want to update.
Click Edit in the Actions column.
Update the member's information.
Click Update to save your changes.
Cancelling or Refunding a Membership
If you need to remove a member from your active membership list, you can cancel their membership.
Find the member in the Membership Sales page.
Click Edit in the Actions column.
Click Cancel Membership (if the membership was free) or Refund (if the membership was paid).
Follow the prompts to complete the cancellation or refund.
The membership will then appear under the Cancelled tab.
Exporting Your Membership List
You can export your membership records as a CSV file for reporting, record-keeping, or use in other systems.
Go to Operations > Memberships > Membership Sales.
Click Export List.
Your membership list will be downloaded as a
.csvfile.
Was this helpful?
Still need help? Ask the team